Commercial Products
Open Source
Web Sessions Installation
This document shows you how to cluster web sessions without the requirements imposed by Terracotta DSO, such as cluster-wide locking, class instrumentation, and class portability. If you must use DSO, see Terracotta DSO Installation.
Step 1: Requirements
- JDK 1.6 or higher.
- Terracotta 4.3.4 or higher Download the kit and run the installer on the machine that will host the Terracotta server. For use with WebSphere, you must have kit version 3.2.1_2 or higher.
- All clustered objects must be serializable. If you cannot use Serializable classes, you must use the custom web-sessions installation (see Terracotta DSO Installation). Clustering non-serializable classes is not supported with the express installation.
- An application server listed in Step 2: Install the Terracotta Sessions JAR.
Step 2: Install the Terracotta Sessions JAR
For guaranteed compatibility, use the JAR files included with the Terracotta kit you are installing. Mixing with older components may cause errors or unexpected behavior.
To cluster your application's web sessions, add the following JAR files to your application's classpath:
${TERRACOTTA_HOME}/sessions/terracotta-session-<version>.jar<version> is the current version of the Terracotta Sessions JAR. For use with WebSphere, you must have Terracotta Sessions JAR version 1.0.2 or higher.
${TERRACOTTA_HOME}/common/terracotta-toolkit-<API->-runtime-ee-<version>.jarThe Terracotta Toolkit JAR contains the Terracotta client libraries. <API> refers to the Terracotta Toolkit API version. <version> is the current version of the Terracotta Toolkit JAR.
If you are using the open-source edition of the Terracotta kit, no JAR files will have "-ee-" as part of their name.
See the following table on suggestions on where to add the sessions and toolkit JAR files based on application server.
| Application Server | Suggested Location for Terracotta Sessions JAR File |
|---|---|
| JBoss AS (earlier than 6.0) | <jboss install dir>/lib |
| JBoss AS 6.0 | <jboss install dir>/common/lib (REQUIRED) |
| JBoss AS 7.0 or 7.1 | <jboss install dir>/WEB-INF/lib |
| Jetty | WEB-INF/lib |
| Tomcat 5.0 and 5.5 | $CATALINA_HOME/server/lib |
| Tomcat 6.0 and 7.0 | $CATALINA_HOME/lib |
| WebLogic | WEB-INF/lib |
| The table above lists the only application servers supported by the express installation. See Platform Support to obtain the latest versions for the listed application servers. |
Step 3: Configure Web-Session Clustering
Terracotta servers, and Terracotta clients running on the application servers in the cluster, are configured with a Terracotta configuration file, tc-config.xml by default. Servers not started with a specified configuration use a default configuration.
To add Terracotta clustering to your application, you must specify how Terracotta clients get their configuration by including the source in web.xml or context.xml.
Find the configuration to use for your application server in the sections below.
Jetty, WebLogic, and WebSphere
Add the following configuration snippet to web.xml:
<filter>
 <filter-name>terracotta</filter-name>
 <!-- The filter class is specific to the application server. -->
 <filter-class>org.terracotta.session.{container-specific-class}</filter-class>
 <init-param>
   <param-name>tcConfigUrl</param-name>
   <!-- <init-param> of type tcConfigUrl has a <param-value> element containing
        the URL or filepath (for example, /lib/tc-config.xml) to tc-config.xml.
    If the Terracotta configuration source changes at a later time,
    it must be updated in configuration. -->
   <param-value>localhost:9510</param-value>
 </init-param>
</filter>
<filter-mapping>
 <!-- Must match filter name from above. -->
 <filter-name>terracotta</filter-name>
 <url-pattern>/*</url-pattern>
 <!-- Enable all available dispatchers. -->
 <dispatcher>ERROR</dispatcher>
 <dispatcher>INCLUDE</dispatcher>
 <dispatcher>FORWARD</dispatcher>
 <dispatcher>REQUEST</dispatcher>
</filter-mapping>
<filter-name> can contain a string of your choice. However, the value of <filter>/<filter-name> must match <filter-mapping>/<filter-name>.
Choose the appropriate value for <filter-class> from the following table.
| Container | Value of <filter-class> |
|---|---|
| Jetty 6.1 |
org.terracotta.session
|
| Jetty 7.4.1 |
org.terracotta.session
|
| WebLogic 9 |
org.terracotta.session
|
| WebLogic 10 |
org.terracotta.session
|
| WebSphere 6.1 |
org.terracotta.session
|
| WebSphere 7.0 |
org.terracotta.session
|
If you have customized a Terracotta configuration file and want to include its contents rather than providing an URL, use an <init-param> of type tcConfig:
<init-param>
<param-name>tcConfig</param-name>
<param-value>&lt;tc:tc-config ... &lt;/tc:tc-config&gt;</param-value>
</init-param>
Use URL-safe codes (also known as "URL escaping") or HTML names for all special characters such as angle brackets ("<" and ">").
Ensure that the Terracotta filter is the first <filter> element listed in web.xml. Filters processed ahead of the Terracotta valve may disrupt its processing.
web.xml should be in /WEB-INF if you are using a WAR file.
Tomcat and JBoss AS 6.0 or Earlier
Add the following to context.xml:
<Valve className="org.terracotta.session.{container-specific-class}"
       tcConfigUrl="localhost:9510"/>
where tcConfigUrl contains an URL or file path (for example, tcConfigURL="/lib/tc-config.xml") to tc-config.xml. If the Terracotta configuration source changes at a later time, it must be updated in configuration.
If you have customized a Terracotta configuration file and want to include its contents rather than providing an URL, replace tcConfigUrl with tcConfig:
<Valve className="org.terracotta.session.{container-specific-class}"
tcConfig="&lt;tc:tc-config ... &lt;/tc:tc-config&gt;"/>
Use URL-safe codes (also known as "URL escaping") or HTML names for all special characters such as angle brackets ("<" and ">"). Choose the appropriate value of className from the following table.
| Container | Value of className |
|---|---|
| JBoss Application Server 4.0 |
org.terracotta.session
|
| JBoss Application Server 4.2 |
org.terracotta.session
|
| JBoss Application Server 5.1 |
org.terracotta.session
|
| JBoss Application Server 6.0 |
org.terracotta.session
|
| Tomcat 5.0 |
org.terracotta.session
|
| Tomcat 5.5 |
org.terracotta.session
|
| Tomcat 6.0 |
org.terracotta.session
|
| Tomcat 7.0 | org.terracotta.session |
For example, to use Tomcat 6.0, the content of context.xml should be similar to the following:
<Context>
<Valve className="org.terracotta.session.TerracottaTomcat60xSessionValve"
       tcConfigUrl="localhost:9510"/>
</Context>
Ensure that the Terracotta valve is the first <Valve> element listed in context.xml. Valves processed ahead of the Terracotta valve may disrupt its processing.
If you use one of the authenticator valves available with Tomcat, you may encounter an UnsupportedOperationException when running with Terracotta clustering. With Tomcat 5.5 and above, users can prevent this error by disabling changeSessionIdOnAuthentication. For example:
|
If you are using a WAR file, context.xml should be in /META-INF for Tomcat and in /WEB-INF for JBoss Application Server.
JBoss AS 7.0 or 7.1
Add the following to WEB-INF/jboss-web.xml:
<?xml version="1.0" encoding="UTF-8"?>

<jboss-web>
...
  <valve>
    <class-name>org.terracotta.session.TerracottaJboss7xSessionValve</class-name>
      <param>
        <param-name>tcConfigUrl</param-name>
        <param-value>localhost:9510</param-value>
      </param>
  </valve>
...
</jboss-web>
where the value for tcConfigUrl contains an URL or file path (for example, /lib/tc-config.xml) to tc-config.xml. If the Terracotta configuration source changes at a later time, it must be updated in configuration.
If you have customized a Terracotta configuration file and want to include its contents rather than providing an URL, replace tcConfigUrl with tcConfig:
<param-name>tcConfig</param-name>
<param-value>&lt;tc:tc-config ... &lt;/tc:tc-config&gt;</param-value>
Use URL-safe codes (also known as "URL escaping") or HTML names for all special characters such as angle brackets ("<" and ">").
Step 4: Start the Cluster
Start the Terracotta server:
UNIX/Linux
[PROMPT] ${TERRACOTTA_HOME}/bin/start-tc-server.sh &Microsoft Windows
[PROMPT] ${TERRACOTTA_HOME}\bin\start-tc-server.bat- Start the application servers.
Start the Terracotta Developer Console:
UNIX/Linux
[PROMPT] ${TERRACOTTA_HOME}/bin/dev-console.sh &Microsoft Windows
[PROMPT] ${TERRACOTTA_HOME}\bin\dev-console.batConnect to the Terracotta cluster. Click Connect... in the Terracotta Developer Console.
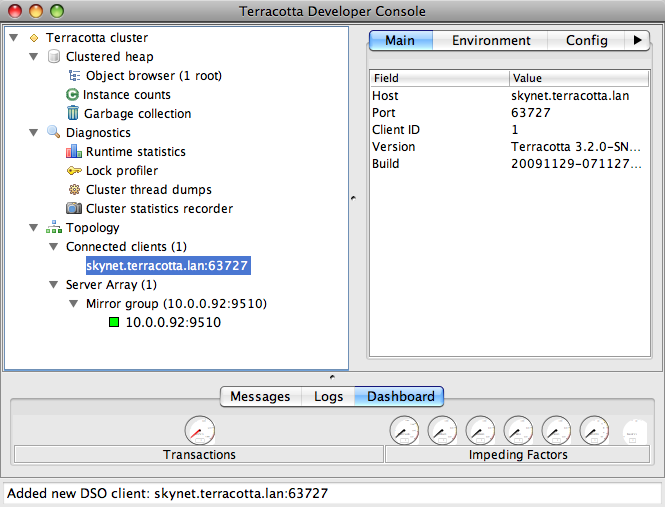
Click the Topology node in the cluster navigation window to see the Terracotta servers and clients (application servers) in the Terracotta cluster. Your console should have a similar appearance to the following figure.
Step 5: Edit the Terracotta Configuration
This step shows you how to run clients and servers on separate machines and add failover (High Availability). You will expand the Terracotta cluster and add High Availability by doing the following:
- Moving the Terracotta server to its own machine
- Creating a cluster with multiple Terracotta servers
- Creating multiple application nodes
These tasks bring your cluster closer to a production architecture.
Procedure:
- Shut down the Terracotta cluster.
Create a Terracotta configuration file called
tc-config.xmlwith contents similar to the following:<?xml version="1.0" encoding="UTF-8"?> <!-- All content copyright Terracotta, Inc., unless otherwise indicated. All rights reserved. --> <tc:tc-config xsi:schemaLocation="http://www.terracotta.org/schema/terracotta-5.xsd" xmlns:tc="http://www.terracotta.org/config" xmlns:xsi="http://www.w3.org/2001/XMLSchema-instance"> <servers> <!-- Sets where the Terracotta server can be found. Replace the value of host with the server's IP address. --> <server host="server.1.ip.address" name="Server1"> <data>%(user.home)/terracotta/server-data</data> <logs>%(user.home)/terracotta/server-logs</logs> </server> <!-- If using a standby Terracotta server, also referred to as an ACTIVE-PASSIVE configuration, add the second server here. --> <server host="server.2.ip.address" name="Server2"> <data>%(user.home)/terracotta/server-data</data> <logs>%(user.home)/terracotta/server-logs</logs> </server> <!-- If using more than one server, add an <ha> section. --> <ha> <mode>networked-active-passive</mode> <networked-active-passive> <election-time>5</election-time> </networked-active-passive> </ha> </servers> <!-- Sets where the generated client logs are saved on clients. --> <clients> <logs>%(user.home)/terracotta/client-logs</logs> </clients> </tc:tc-config>- Install Terracotta 4.3.4 on a separate machine for each server you configure in
tc-config.xml. - Copy the
tc-config.xmlto a location accessible to the Terracotta servers. - Perform Step 2: Install the Terracotta Sessions JAR on each application node you want to run in the cluster. Be sure to install your application and any application servers on each node.
Edit
web.xmlorcontext.xmlon each application server to list both Terracotta servers:<param-value>server.1.ip.address:9510,server.2.ip.address:9510</param-value>or
tcConfigUrl="server.1.ip.address:9510,server.2.ip.address:9510"Start the Terracotta server in the following way, replacing "Server1" with the name you gave your server in
tc-config.xml:UNIX/Linux
[PROMPT] ${TERRACOTTA_HOME}/bin/start-tc-server.sh -f <path/to/tc-config.xml> \
   -n Server1 &
Microsoft Windows
[PROMPT] ${TERRACOTTA_HOME}\bin\start-tc-server.bat -f <path\to\tc-config.xml> ^
   -n Server1 &
If you configured a second server, start that server in the same way on its machine, entering its name after the
-nflag. The second server to start up becomes the "hot" standby, or PASSIVE. Any other servers you configured will also start up as standby servers.- Start all application servers.
- Start the Terracotta Developer Console and view the cluster.
Step 6: Learn More
To learn more about working with a Terracotta cluster, see the following documents:
- Working with Terracotta Configuration Files – Explains how
tc-config.xmlis propagated and loaded in a Terracotta cluster in different environments. - Terracotta Server Arrays – Shows how to design Terracotta clusters that are fault-tolerant, maintain data safety, and provide uninterrupted uptime.
- Configuring Terracotta Clusters For High Availability – Defines High Availability configuration properties and explains how to apply them.
- Terracotta Developer Console – Provides visibility into and control of caches.